Esperimenti con multipath e SAN
http://www-01.ibm.com/support/docview.wss?uid=isg3T1011985
http://www.sysadminshare.com/2013/06/multipath-config-status-check-in-linux.html
https://access.redhat.com/documentation/en-US/Red_Hat_Enterprise_Linux/5/html-single/DM_Multipath/index.html#config_file_multipath
https://serverfault.com/questions/288087/linux-multipath-not-using-all-paths-and-wont-use-queue-length-path-selector/355151
https://h50146.www5.hpe.com/products/software/oe/linux/mainstream/support/doc/option/fibre/pdfs/c02020121.pdf
grep mpt /sys/class/scsi_host/host?/proc_name
rescan-scsi-bus.sh
echo “- – -” > /sys/class/scsi_host/host1/scan
multipath -l
multipathd -k”fail path sdb”
multipathd -k”del path sdb”
multipathd -k”reinstate path sdb”
multipathd -k”show paths”
dmsetup remove /dev/mapper/MSA_BELLNET
dmsetup ls
echo 1 > /sys/block/sde/device/delete
echo 1 > /sys/block/sda/device/rescan
service multipath-tools restart
partprobe /dev/sdb
sfdisk -R /dev/sdb
partx -u /dev/sdb
blockdev –rereadpt /dev/mapper/MSA_BELLNET
partprobe -s
pvcreate –uuid “DMD39I-rIMF-vVUc-6KaY-li2N-SF4n-v38O5m” –restorefile /root/VG-BELL.vg /dev/disk/by-id/scsi-MSA_BELLNET
vgcfgbackup -f VG-BELL.vg VG-BELL
vgcfgrestore -f VG-BELL.vg VG-BELL
multipath.conf
defaults {
        polling_interval        15
        path_selector           "round-robin 0"
        path_grouping_policy    multibus
        prio                    const
        path_checker            directio
        rr_min_io               100
        flush_on_last_del       no
        max_fds                 8192
        rr_weight               priorities
        failback                immediate
        no_path_retry           fail
        queue_without_daemon    no
        user_friendly_names     yes
        mode                    644
        uid                     0
        gid                     disk
}
blacklist {
        devnode "^(ram|raw|loop|fd|md|dm-|sr|scd|st)[0-9]*"
        devnode "^hd[a-z]"
        devnode "^sda"
        devnode "^sda[0-9]"
        wwid    "3600508b1001c1f5b93df16da7e7ab72e"
        wwid    "3600508b1001c81da7e4515d6a1c3a693"
        wwid    "OCZ-VELO_DRIVE_OCZ-938561J47139J405"
        wwid    "OCZ-VELO_DRIVE_OCZ-ADU3LJ4GZL225676"
        wwid    "OCZ-VELO_DRIVE_OCZ-V98FXMA0Q041W67U"
#       wwid 3600c0ff0001432f020c55c5901000000
        device {
                vendor HP
                product "P410i|LOGICAL"
        }
}
devices {
        device {
                vendor                  "HP"
                product                 "P2000 G3*"
                path_grouping_policy    "group_by_prio"
#               uid_attribute           "ID_SERIAL"
                path_checker            "tur"
                path_selector           "round-robin 0"
                features                "0"
                hardware_handler        "0"
                prio                    "alua"
                rr_weight               "uniform"
                failback                "immediate"
                no_path_retry           18
                rr_min_io               100
        }
}
multipaths {
        multipath {
                wwid 3600c0ff00014e4ed9724235801000000
                alias MSA_NETLITE
        }
        multipath {
                wwid 3600c0ff00014e4edfa37695801000000
                alias MSA_NETLITE_BACKUP
        }
        multipath {
#               path_grouping_policy    multibus
                wwid 3600c0ff0001432f020c55c5901000000
                alias MSA_BELLNET
        }
        multipath {
                wwid 3600c0ff0001432f0a80e5a5901000000
                alias MSA_BELLNET_BACKUP
        }
}
andrea
- Published in Sistemistica, Tips & Tricks, vpn
Proxy Squid
squid.conf
http_port 8081
#http_port 10.1.1.5:8082
pid_filename /var/run/squid3-2.pid
cache_mgr [email protected]
visible_hostname NETLITEPROXY
#dns_nameservers 8.8.8.8 8.8.4.4 208.67.222.123 208.67.220.123
dns_nameservers 10.5.1.5
dns_timeout 1 minutes
positive_dns_ttl 1 hours
negative_dns_ttl 10 minutes
fqdncache_size 51200
ipcache_size 51200
#pipeline_prefetch on
cache_dir aufs /var/lib/vz/squid/cache/squid3-2/aufs-small 1024 16 256 max-size=32768
cache_dir aufs /var/lib/vz/squid/cache/squid3-2/aufs-large 4096 16 256
cache_mem 2048 MB
minimum_object_size 0 KB
cache_replacement_policy heap LFUDA
memory_replacement_policy heap GDSF
memory_pools on
maximum_object_size 128 MB
minimum_object_size 0 KB
maximum_object_size_in_memory 512 KB
ie_refresh on
cache_access_log /var/log/squid3/access-2.log
#cache_access_log /dev/null
#cache_log /var/log/squid3/cache-2.log
cache_log /dev/null
#cache_store_log /var/log/squid3/store-2.log
cache_store_log /dev/null
logfile_rotate 0
log_mime_hdrs off
log_icp_queries off
buffered_logs on
redirect_rewrites_host_header off
acl QUERY urlpath_regex cgi-bin \?
no_cache deny QUERY
acl SSL_ports port 443          # https
acl SSL_ports port 563          # snews
acl SSL_ports port 873          # rsync
acl SSL_ports port 8080          # rsync
acl Safe_ports port 80          # http
acl Safe_ports port 21          # ftp
acl Safe_ports port 443         # https
acl Safe_ports port 70          # gopher
acl Safe_ports port 210         # wais
acl Safe_ports port 1025-65535  # unregistered ports
acl Safe_ports port 280         # http-mgmt
acl Safe_ports port 488         # gss-http
acl Safe_ports port 591         # filemaker
acl Safe_ports port 777         # multiling http
acl Safe_ports port 631         # cups
acl Safe_ports port 873         # rsync
acl Safe_ports port 901         # SWAT
acl purge method PURGE
acl CONNECT method CONNECT
http_access deny !Safe_ports
http_access deny CONNECT !SSL_ports
debug_options ALL,1
client_lifetime 12 hour
half_closed_clients off
pconn_timeout 5 minutes
request_timeout 5 minutes
connect_timeout 30 seconds
authenticate_ttl 15 minutes
authenticate_ip_ttl 15 minutes
max_open_disk_fds 32768
acl java_jvm browser Java/1. J/SSL
#acl localhost src 127.0.0.1/32
#acl reti_abilitate src 127.0.0.1/32
acl reti_abilitate src 10.5.1.0/24
acl netlite src 212.29.137.82/32 #netlite office
acl netlite src 87.248.52.82/32 #netlite office
acl no_cache_siti dstdomain "/etc/squid3/no-cache-siti.txt"
acl siti_pubblici dstdomain "/etc/squid3/siti-pubblici.txt"
acl lan-allowed-ip src "/etc/squid3/good-lan-ip.txt"
http_access allow lan-allowed-ip
# MAC Utenti Bovolone
acl MAC arp "/etc/squid3/mac.txt"
acl emerge browser Wget
http_access allow emerge
always_direct allow emerge
acl aptupdate browser APT-HTTP
http_access allow aptupdate
always_direct allow aptupdate
http_access allow purge localhost
http_access deny purge
http_access deny !Safe_ports
http_access deny connect !SSL_ports
http_access allow netlite
http_access deny !reti_abilitate
http_access allow siti_pubblici
http_access allow java_jvm
no_cache deny no_cache_siti
always_direct allow no_cache_siti
#request_header_access Allow allow all
#request_header_access Authorization allow all
#request_header_access WWW-Authenticate allow all
#request_header_access Proxy-Authorization allow all
#request_header_access Proxy-Authenticate allow all
#request_header_access Cache-Control allow all
#request_header_access Content-Encoding allow all
#request_header_access Content-Length allow all
#request_header_access Content-Type allow all
#request_header_access Date allow all
#request_header_access Expires allow all
#request_header_access Host allow all
#request_header_access If-Modified-Since allow all
#request_header_access Last-Modified allow all
#request_header_access Location allow all
#request_header_access Pragma allow all
#request_header_access Accept allow all
#request_header_access Accept-Charset allow all
#request_header_access Accept-Encoding allow all
#request_header_access Accept-Language allow all
#request_header_access Content-Language allow all
#request_header_access Mime-Version allow all
#request_header_access Retry-After allow all
#request_header_access Title allow all
#request_header_access Connection allow all
#request_header_access Proxy-Connection allow all
#request_header_access User-Agent allow all
#request_header_access From allow all
#request_header_access Referer allow all
#request_header_access Cookie allow all
#request_header_access All deny all
request_header_access All allow all
follow_x_forwarded_for deny all
forwarded_for delete
via off
forwarded_for off
http_reply_access allow all
icp_access allow all
coredump_dir /var/cache
balance_on_multiple_ip off
#http_access deny !MAC
# utilizzati per ftp anonimo
ftp_user [email protected]
ftp_passive on
acl ftp proto FTP
acl ftp_port port 21
http_access allow ftp_port CONNECT
ftp_epsv off
#dns_v4_first on
http_access allow all
andrea
- Published in Sistemistica, Tips & Tricks, vpn
OpenVPN con più VPN attive contemporaneamente
La documentazione di OpenVPN non è chiarissima a riguardo ma spesso ci può capitare di dover lavorare con più collegamenti VPN attivi contemporaneamente.
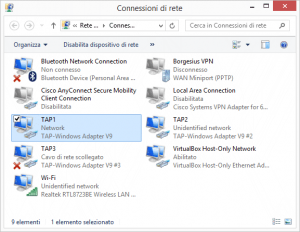
Openvpn permette questo a patto che siano presenti più device TAP altrimenti alla partenza della seconda VPN ci viene segnalato che non vi sono dispositivi liberi disponibili.
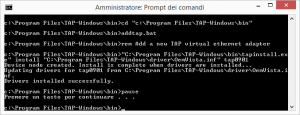
Per creare ulteriori device TAP basta eseguire:
cd c:\Program Files\TAP-Windows\bin
addtap.bat
andrea
- Published in Sistemistica, Tips & Tricks, vpn
Ubuntu Server e versioni multiple di PHP
Dopo qualche ricerca, pur non apprezzando affatto il codice non in chiaro, ho utilizzato questo progetto per la gestione di molteplici versioni di PHP in un server virtualizzato dedicato all’hosting e gestito tramite Virtualmin .
https://github.com/phpbrew/phpbrew
[code]
Scarico ed installo lo script:
[code]
wget https://raw.github.com/c9s/phpbrew/master/phpbrew
chmod +x phpbrew
mv phpbrew /usr/local/sbin/phpbrew
Si inizializza il sistema:
phpbrew init
export PHPBREW_ROOT=/opt/phpbrew
source ~/.phpbrew/bashrc
E si installa la versione desiderata:
apt-get install libmcrypt-dev
phpbrew install php-5.4.13 +default +mysql +gettext +mcrypt +intl +iconv +ftp +exif +dba +openssl +soap +apxs2=/usr/bin/apxs2 -- --with-libdir=lib/x86_64-linux-gnu --with-gd=shared --enable-gd-native-ttf --with-jpeg-dir=/usr --with-png-dir=/usr --enable-wddx --with-mysql-sock=/var/run/mysqld/mysqld.sock
Tutto quanto necessario viene salvato in /opt/phpbrew e per renderlo visibile a webmin basta creare una directory e fare un link simbolico:
mkdir /opt/rh/
ln -s /opt/phpbrew/php/php-5.4.14 /opt/rh/php54
A questo punto andando nella console di Webmin in System Settings -> Re-Check Configuration il sistema ricerca le versioni di php presenti e le rende accessibili per virtualhost in Server Configuration -> PHP Versions.
andrea
- Published in Sistemistica, Tips & Tricks
Proxmox firewall sul Bridge esterno
A volte c’è la necessità di esporre direttamente su internet alcune VM utilizzando un bridge sull’interfaccia esterna.
Di default il bridge non fa transitare i pacchetti da netfilter quindi non è possibile implementare alcun controllo di sicurezza.
Per ovviare a questo comportamento basta attivare questa funzione con:
echo 1 > /proc/sys/net/bridge/bridge-nf-call-iptables
e per rendere definitive le modifiche, inserire in /etc/sysctl.conf:
net.bridge.bridge-nf-call-iptables = 1
net.bridge.bridge-nf-call-arptables = 1
a questo punto i pacchetti transiteranno dalle catene standard e sarà possibile attivare singolarmente le porte in ingresso ed in uscita utilizzando il modulo di controllo sull’interfaccia fisica:
iptables -A FORWARD -m physdev --physdev-out veth201.0 -m multiport -p tcp --dports 80 -j ACCEPT
iptables -A FORWARD -m physdev --physdev-in veth201.0 -m multiport -p udp --dports 53 -j ACCEPT
iptables -A FORWARD -m physdev --physdev-in veth201.0 -m multiport -p tcp --dports 80 -j ACCEPT
andrea
- Published in Sistemistica, Tips & Tricks, Virtualizzazione
Forti client SSL VPN CLI come collegarsi in vpn con Linux
Avendo la necessità di configurare una VPN verso apparecchiature FORTINET abbiamo rilevato alcune criticità e le abbiamo risolte con questo semplice script.
#!/usr/bin/expect -f
set timeout -1
spawn ./forticlientsslvpn_cli --server vpn.xxxx.xx:10443 --vpnuser user
expect "Password for VPN:" {send -- "password\r"}
expect "to this server? (Y/N)\r" {send -- "y\r"}
expect eof
Oppure questo:
#!/usr/bin/expect -f
spawn ./forticlientsslvpn_cli --server : --vpnuser  2>&1
log_user 0
send_user "Logging in\n"
expect "Password for VPN:"
send "\n"
# i needed ths for 'certificate error'
expect "Would you like to connect to this server"
send "Y\n"
send_user "Beginning to connect\n"
expect "STATUS::Tunnel running"
send_user "Tunnel running!\n"
# this is how long the next expect waits for pattern match, in seconds
set timeout 90001
expect "STATUS::Tunnel closed"
send_user "Tunnel closed!\n"
send_user "Dying\n"
close
exit
Potrebbe essere necessario installare il ppp, expect e le librerie di compatibilità per eseguibili a 32 bit.
apt-get install ppp
apt-get install expect
apt-get install lib32stdc++6
Qui il LINK per scaricare il client.
Andrea
- Published in Sistemistica, Tips & Tricks
PROXMOX Tablet Pointer vs vmMouse
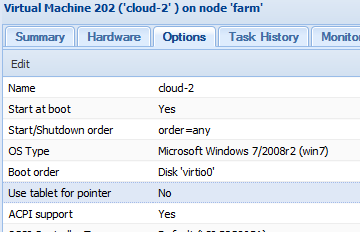
Nelle macchine virtuali KVM di proxmox è prevista l’integrazione del mouse tramite la specifica voce nel pannello delle Opzioni.

Rimuovendo questa funzione nella console remota VNC si ha un fastidioso effetto di sdoppiamento del mose.
Il vantaggio della rimozione sta in un piccolo miglioramento delle performance, vedrete che una VM Windows a riposo consuma 3/4% di cpu mentre dopo la modifica il consumo scende all’1%.
Con molte macchine Windows virtualizzate la differenza di vede.
Per riallineare i mouse del client e della VM basta installare il driver per il mouse di vmWare qui:
Versione A (testata su windows XP 32 bit)
Versione B (testata su windows 2003 32bit)
Versione C (non testata)
La procedura per estrarre i drivers è la seguente.
Scaricate dal sito di vmWare il driver desiderato DA QUI.
Eseguite il comando per la scompattazione, ed esempio:
VMware-tools-9.4.10-2068191-i386.exe /A /P C:\Extract
Questo genererà una directory in C: che conterrà in VMWARE … Drivers anche i drivers per il mouse.
A questo punto basta togliere il supporto per il tablet da Proxmox e provvedere all’installazione dei drivers.
andrea
- Published in Sistemistica, Tips & Tricks
Microserver N54L Firmware 2013
Purtroppo l’accesso il firmware dei Microserver HP è stato ristretti ai sottoscritto di di un contratto di assistenza attivo.
Questo è chiaramente fastidioso e francamente incomprensibile.
Per questo motivo qui di seguito trovate i files originali più un firmware modificato che permette di avere un BIOS più personalizzabile e permette di sbloccare la velocità delle ulteriori due porte SATA presenti a bordo per chi vuole utilizzarle con set di dischi superiore a 4.
Una volta utilizzato il tool HP per creare l’USB stick con autoboot potete effettuare il flash del firmware (non viene richiesta interazione umana per cui è possibile effettuare l’operazione su di un NAS senza monitor e tastiera).
Potete anche sosituire sull’USB stick il file del Firmware con questo:
O41100113.ROM
presente nel file zip per avere le funzionalità aggiuntive (testato su un N45L).
Andrea
- Published in Sistemistica, Tips & Tricks
Linux e il RAID Software (Tips)
Questo script calcola i settaggi raccomandati per la creazione di filesystem ext2, etx3 e ext4 su device RAID.
- Published in Sistemistica, Tips & Tricks
DVB Multicast Digitale Terrestre con Linux
Utilizziamo per questi test:
a) un HP MiniServer dotato di due slot PCIe
b) due schede DVB-T linux compatibili
Per un cliente dotato di numerose postazioni utente e sedi distaccate abbiamo effettuato una serie di test funzionali al file di trasmettere in rete locale il maggior numero di canali del digitale terrestre.
La trasmissione avverrà senza ricompressione o alterazione del flusso e sfruttando i multicast offerti dalla loro infrastruttura.
E’ risaputo che la trasmissione dei flussi digitali avviene per blocchi di frequenze (Multiplexer) ed è quindi sufficiente sintonizzare una scheda su una di queste frequenze per ricevere, e potenzialmente trasmettere, tutti i flussi video e audio presenti in quello specifico multiplex.
Abbiamo valutato che con due schede DVB-T dotate di due sintonizzatori avremmo coperto un discreto range di canali senza saturare le risorse hardware a disposizione (CPU e banda).
Abbiamo scelto Ubuntu Server su piattaforma 64 con un setup minimo che comprenda i tools di sviluppo per linux.
Abbiamo acquistato due schede PCIe DBV-T/T2 T982 Dual Twin Tuner e le abbiamo installate nei due slot liberi del Microserver.
Abbiamo compilato i drivers della scheda video resi disponibili dal produttore insieme all’ultimo layer Multimediale del kernel di linux.
Collegate le quattro prese antenna e riavviato il Microserver le schede ci rendono quindi disponibili 4 diversi sintonizzatori.
Effettuiamo quindi una scansione dei canali:
scan /usr/share/dvb/dvb-t/ ... -u > channels.txt
Ottenendo:
CBBC Channel:505833330:INVERSION_AUTO:BANDWIDTH_8_MHZ:FEC_3_4:FEC_3_4:QAM_16:TRANSMISSION_MODE_2K:GUARD_INTERVAL_1_32:HIERARCHY_NONE:620:621:4671
BBC Red Button:505833330:INVERSION_AUTO:BANDWIDTH_8_MHZ:FEC_3_4:FEC_3_4:QAM_16:TRANSMISSION_MODE_2K:GUARD_INTERVAL_1_32:HIERARCHY_NONE:0:0:4479
BBC NEWS:505833330:INVERSION_AUTO:BANDWIDTH_8_MHZ:FEC_3_4:FEC_3_4:QAM_16:TRANSMISSION_MODE_2K:GUARD_INTERVAL_1_32:HIERARCHY_NONE:640:641:4415
BBC THREE:505833330:INVERSION_AUTO:BANDWIDTH_8_MHZ:FEC_3_4:FEC_3_4:QAM_16:TRANSMISSION_MODE_2K:GUARD_INTERVAL_1_32:HIERARCHY_NONE:0:0:4351
BBC TWO:505833330:INVERSION_AUTO:BANDWIDTH_8_MHZ:FEC_3_4:FEC_3_4:QAM_16:TRANSMISSION_MODE_2K:GUARD_INTERVAL_1_32:HIERARCHY_NONE:610:611:4228
BBC ONE:505833330:INVERSION_AUTO:BANDWIDTH_8_MHZ:FEC_3_4:FEC_3_4:QAM_16:TRANSMISSION_MODE_2K:GUARD_INTERVAL_1_32:HIERARCHY_NONE:600:601:4164
ITV1:481833330:INVERSION_AUTO:BANDWIDTH_8_MHZ:FEC_2_3:FEC_1_2:QAM_64:TRANSMISSION_MODE_2K:GUARD_INTERVAL_1_32:HIERARCHY_NONE:520:521:8261
ITV2:481833330:INVERSION_AUTO:BANDWIDTH_8_MHZ:FEC_2_3:FEC_1_2:QAM_64:TRANSMISSION_MODE_2K:GUARD_INTERVAL_1_32:HIERARCHY_NONE:530:531:8325
Channel 4:481833330:INVERSION_AUTO:BANDWIDTH_8_MHZ:FEC_2_3:FEC_1_2:QAM_64:TRANSMISSION_MODE_2K:GUARD_INTERVAL_1_32:HIERARCHY_NONE:560:561:8384
Dove:
Column A is the channel name.
Column B is the frequency (in Hz) of the multiplex this channel broadcasts on. The channels will be grouped together in the file by multiplex, so the frequency won’t change on every line.
Column D is the bandwidth. In the UK it will almost certainly be 8MHz.
Column G is the phase modulation type for the channel. I won’t try to explain it (you can delve into Wikipedia for that), suffice to say you’ll need to know it later. This should be the same for each channel that broadcasts on the same multiplex.
Column M (the last one) is the SID (service identifier) for the channel. This is very important as it is what dvblast uses to identify which channel to broadcast. Note that this is not the same as the EPG channel number, which isn’t shown in the file.
Multiplex 1
;BBC News
239.255.1.80:5004 1 4415
;BBC One
239.255.1.1:5004 1 4164
;BBC Red Button
239.255.1.105:5004 1 4479
;BBC Three
239.255.1.7:5004 1 4351
;BBC Two
239.255.1.2:5004 1 4228
;CBBC Channel
239.255.1.70:5004 1 4671
If your network switches support multicast, pick a multicast address. There’s a long and detailed document from the IANA about picking one, but unless you are already using multicast on your network then you really just need to pick something in the 239.255.000.000-239.255.255.255 range, which is identified by the IANA as the Site-Local Scope. Anything in this range should work. I used 239.255.1.1 as shown below.
If your network doesn’t support multicast, or you don’t want to use it for whatever reason, then enter the broadcast address for your local subnet.
dvblast -a 0 -c /root/M1.cfg -f 505833330 -m qam_16 -b 8 -e
-a n tells dvblast to use tuner number n for this multiplex. Obviously, you can’t use each tuner more than one at any one time. Numbering starts at 0, not 1, you idiots.
-c nameoffile.cfg tells dvblast to use the config file you just write. It doesn’t matter where you save it.
-f 000000000 is where you specify the frequency for this multiplex. Remember how you noted that down from the scan listing earlier? You better have done, because next you’ll need…
-m qam_x the modulation type for this multiplex. And then…
-b n the bandwidth for this multiplex.
-e Finally, -e tells dvblast to also stream the EPG data. You’ll see how to use this in VLC later, and it’s very exciting. No, really. Shut up, it’s exciting, damnit.
Dopo alcuni test abbiamo scelto di utilizzare singoli indirizzi IP per ogni canale invece di utilizzare lo stesso ip con porte diverse al fine di mantenere sotto controllo la banda utilizzata.
Infatti utilizzando lo stesso ip per tutti i canali si otteneva una ricezione da parte del client connesso di tutto il flusso dati emesso dal server e non del solo flusso relativo al canale desiderato.
Abbiamo poi implementato la trasmissione ciclica di filmati in diversi formati (MPEG4, H264, MPEG2) utilizzando VLC
vlc -vvv file:////path/to/file --sout '#rtp{access=udp,mux=ts,dst=224.3.1.100,port=1000,sap,group="Video",name="Test Multicast 1"}'
Dovrebbe anche essere possibile definire in ingresso un flusso dati (RadioWeb ad esempio) ed effettuarne il Multicast in rete, come dovrebbe essere possibile ricodificare il flusso audio/video all’interno dello stesso comando.
Funzioni che testeremo alla prima necessità.
Radio24 http://shoutcast.radio24.it:8000/
Riferimenti:
LINK
LINK
LINK
LINK
LINK
LINK
A.Gagliardi 2014
- Published in Sistemistica, Tips & Tricks


